How to Take a Screenshot on a Computer (Windows & Mac)
Taking a screenshot helps you save what’s on your screen—useful for tutorials, errors, online classes, or sharing information. Below are easy methods for Windows and Mac computers.
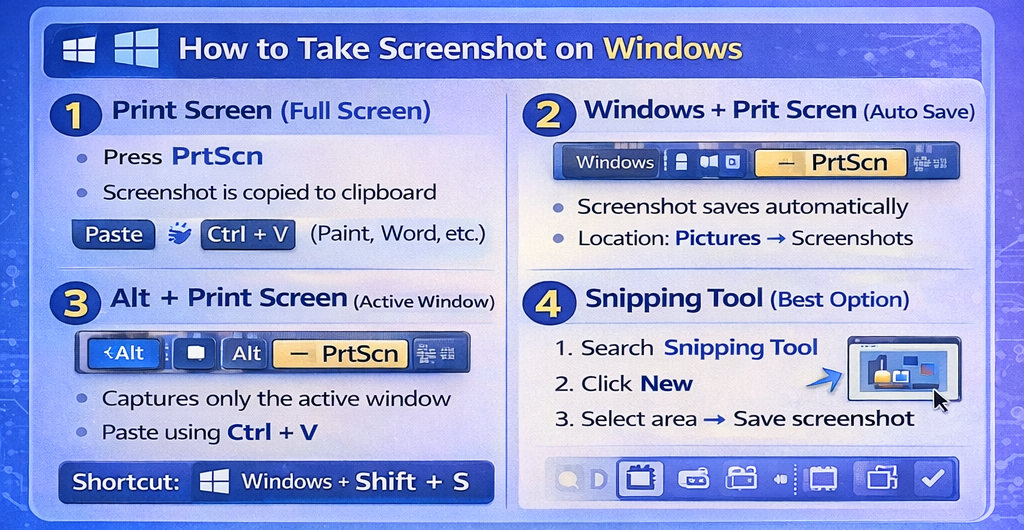
📸 How to Take Screenshot on Windows
Method 1: Print Screen (Full Screen)
Press PrtScn
Screenshot is copied to clipboard
Paste using Ctrl + V (Paint, Word, etc.)
Method 2: Windows + Print Screen (Auto Save)
Press Windows + PrtScn
Screenshot saves automatically
Location: Pictures → Screenshots
Method 3: Alt + Print Screen (Active Window)
Press Alt + PrtScn
Captures only the active window
Paste using Ctrl + V
Method 4: Snipping Tool (Best Option)
Search Snipping Tool
Click New
Select area → Save screenshot
Shortcut: Windows + Shift + S
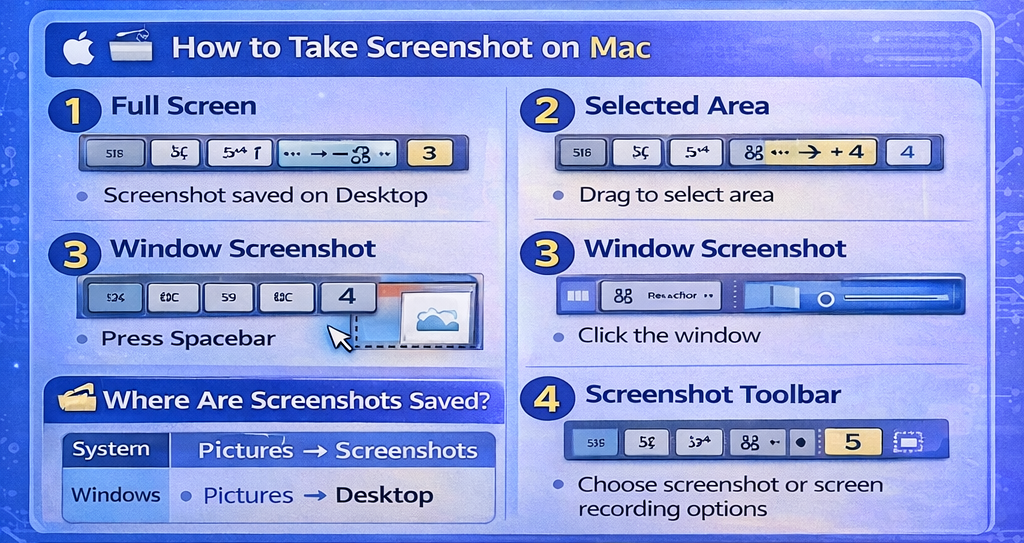
🍎 How to Take Screenshot on Mac
Method 1: Full Screen
Press Command (⌘) + Shift + 3
Screenshot saved on Desktop
Method 2: Selected Area
Press Command (⌘) + Shift + 4
Drag to select area
Method 3: Window Screenshot
Press Command (⌘) + Shift + 4
Press Spacebar
Click the window
Method 4: Screenshot Toolbar
Press Command (⌘) + Shift + 5
Choose screenshot or screen recording options
📂 Where Are Screenshots Saved?
System
Location
Windows
Pictures → Screenshots
Mac
Desktop
✅ Tips
Use Snipping Tool (Windows) for editing
Use Preview app (Mac) to edit screenshots
Rename files for easy organization
🧠 Conclusion
Taking a screenshot on a computer is quick and easy using keyboard shortcuts or built-in tools. Whether you’re using Windows or Mac, these methods work for beginners and professionals.